

Objective
While building a complex Raspberry Pi Pico robotics project, I wanted to be able to choose whether to build my model as normal, or to build a set of unit tests. This was particularly important for me because there were multiple moving parts, many of which had to work in co-ordination with each other and/or had safe working range limits. I needed to be able to check all the edge case conditions to make sure that parts wouldn’t crash in to each other or behave unexpectedly.
My Solution
I am using VS Code with the Raspberry Pi Pico extension to write and manage the coding aspect of my project. I put my source code under two separate directories (called src and test) and then have the build system create two executable targets. The actual robot model is based purely on the code within the src directory structure, and a set of unit tests defined under the test directory structure which would refer to the code under the src directory tree. The unit tests would report back over the USB connection to my PC with the results of the tests. I did consider running the tests directly on my PC (it’s not too hard using mocks) but I am a big believer in keeping the test environment as close as possible to the live one.
Step 1: Create the project
I am assuming that VS Code is already installed and working, along with the Raspberry Pi Pico extension. I also am going to assume that you already have the “CMake Tools” extension installed. If not then do all of that first there are plenty of good tutorials on how to do that elsewhere, and this “How To” is long enough already.
Use the Pico extension to create a new C++ project in the normal way by:
- Clicking the “Pico” icon in the left-hand toolbar to reveal the sidebar menu of actions.
- Choose the “New C/C++ Project” option to reveal the project creation dialog view.
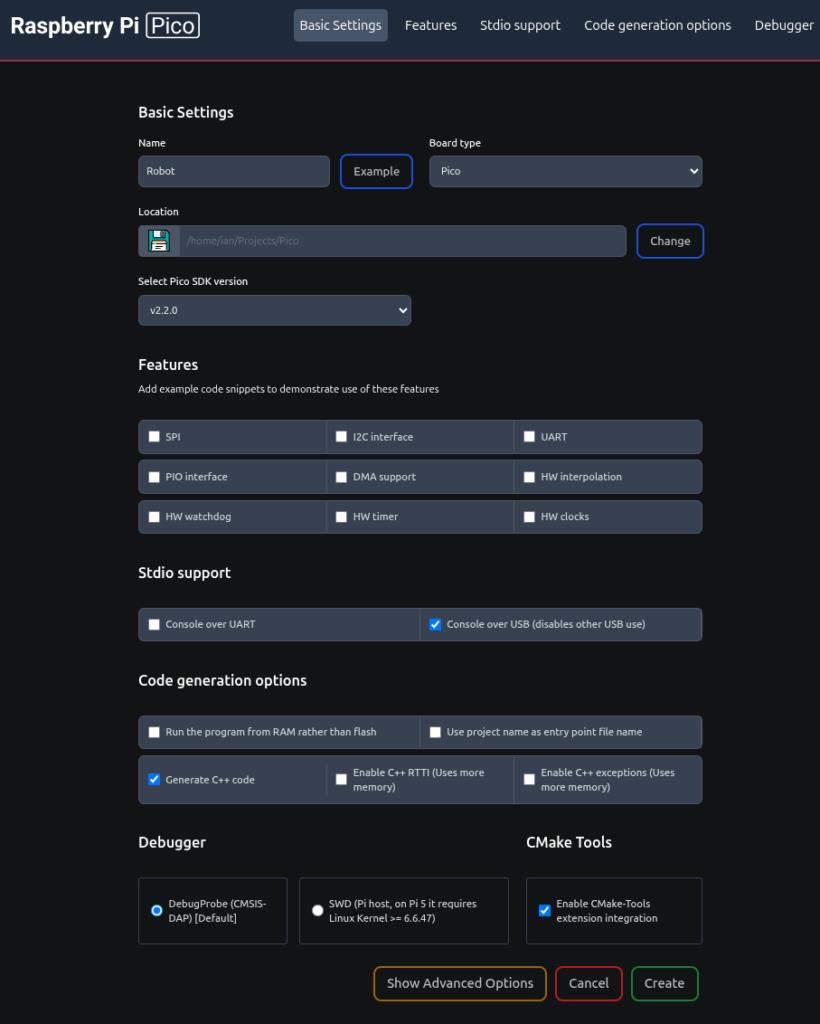
- Name your project. For the sake of this tutorial I have called mine “Robot”, but the name is unimportant.
- Choose your board type from the drop-down list (such as “Pico” or “Pico 2” etc.
- Ensure that the location shown for where the project directory will be created is where you want it to be,
- Optionally select which SDK you wish to use. You can probably let that default.
- Select any features that you need for your project such as “SPI” or “I2C”, etc. For the purpose of this tutorial I didn’t choose any.
- Choose which stdio support you need UART/USB/None. I chose both UART (for the debugger) and USB for my test harness to report back over.
- Select any code generation options that you want. I chose “Generate C++ code”.
- Select the debugger option that you prefer. I use “DebugProbe”.
- Tick the “Enable CMake-Tools extension integration”
- Click the “Create” button.
For convenience here is a screen shot of my filled in dialog:
At this point you should have a normal Pico base project setup for you. You would be wise to build and run it to make sure that everything is working… It will be!
Step 2: Modify the file structure
My reason for doing this is to be able to unit test my code. So I want two source code trees: One for actual robot model; The other for the unit tests that I will write to check my logic. So I did this:
- Create a directory called “src” under the root of the project (where you currently have your “main.cpp” file.
- Make a copy of the “CMakeLists.txt” file that is in the project root and place the copy into the new “src” directory. It is very important that the name is exactly as show above (case matters and it is Lists plural).
- Open the “CMakeLists.txt” file that is in “/src” and delete everything down to (but not including) the “add_executable(…)” line.
- Find the line that starts “target_include_directories(” and change the “PRIVATE” to “PUBLIC” and save the file. We’ll make more changes later.
- Now open the original “CMakeLists.txt” file in the project root and delete everything below (but not including) the line “pico_sdk_init()”. In other words all the stuf that is now in the other “src/CMakeLists.txt” file. At the very bottom of this file add the line: add_subdirectory(src) and save the file.
- Move the existing “main.cpp” file (or whatever your application entry point file is called) into the newly created “src” directory.
- Rebuild the project and run it to make sure that you haven’t accidentally broken anything.
At this point your project behaves exactly as it did by default, with the exception that you have your source code under the “src” folder instead of in the project root.
Now we are going to make a couple of improvements that will make it easier to have a second target and to be able to share the source files with the test rig. Start by creating the file “src/src_files.cmake” and in it enter the following code:
set(SRC_FILES
        dummy.cpp
)
This is where you will add the names of all your source files (except for the one with the main() definition in it. However, for now just add the name of an empty file (I called it “dummy.cpp” here, but the name is unimportant) to keep the compiler happy. Save the file and close it for now.
Now edit the “src/CMakeFiles.txt” file. At the very top add the following two lines:
set(NAME MyTargetName)

include(src_files.cmake)
The first line creates a variable that can be used everywhere that you would write the name of this build target. Here I have called the build target “MyTargetName” but you can give it whatever name you wish. I often just use “${CMAKE_PROJECT_NAME}” as the target here. The second line includes the variable that we defined in the “src/src_files.cmake” file, which will be a list of all your source files.
Now let’s use that new target name variable in all the places where the target name is currently hard coded by default. This makes it easy to change the name of the target later. That will come in handy later when we use this file as a template for the test harness that we’ll create later.
Replace the first parameter of the following functions with ${NAME}
- add_executable(${NAME} …)
- pico_set_program_name(${NAME} “${NAME}”)
- pico_set_program_version(${NAME} …)
- target_link_libraries(${NAME} …)
- target_include_directories(${NAME} …)
- pico_add_extra_outputs(${NAME} …)
The exception being the “pico_set_program_name(” which has both parameters set to the target name. Save the file and we’re done.
Rebuild and run the project again just to make sure that we haven’t broken anything.
Step 3: Add a second target to build
Create something trivial to be your second build target
- Create a directory called “test” (or whatever is appropriate to your needs) under the root of the project (where you created the “src” directory in the last step).
- Copy the existing “main.cpp” file from the “src” directory into the new “test” (or whatever you named it) directory. We’ll use this to test everything works.
- Rename the newly created file under “test” (or whatever you called the new directory) to be something appropriate for your new build target. For me I will call it “AllTests.cpp” as it will eventually be my test runner.
- Change the new file so that when it runs you can tell it apart from the original “main.cpp”. I just changed the wording in the “printf” statement that is sent back over the USB console from “Hello world!” to “Hello from the Test Harness!”.
- Copy the “src/CMakeLists.txt” file and place it in your newly created “test” (or whatever) directory.
- Edit this new file and make these changes to it:
- Change the “include(src_files.cmake)” line to:
- include (${CMAKE_SOURCE_DIR}/src/src_files.cmake)
- Change the set(NAME targetName) to match the purpose of your new target. In my case the new line will be set(TEST “TestHarness”)
- Change the name of the source file in the “add_executable()” to your new entry point file “AllTests.cpp” in my case
- Add another directory in the target_include_directories(…) definition. Add the line “${CMAKE_SOURCE_DIR}/src” just before the closing parenthesis.
- Change the “include(src_files.cmake)” line to:
- Finally re-edit the “/CMakeFiles.txt” and add our “test” (or whatever) directory to the build by adding the line “add_subdirectory(test EXCLUDE_FROM_ALL)” after the existing “add_subdirectory(…)” line.
Simplify Changing Targets for the Build
To simplify selecting which target to build/deploy edit the “.vscode/settings.json” file and search for the section “cmake.options.statusBarVisibility” and change it to match the following:
    "cmake.options.statusBarVisibility": "visible",
    "cmake.options.advanced": {
        "build": {
            "statusBarVisibility": "visible"
        },
        "launch": {
            "statusBarVisibility": "visible"
        },
        "debug": {
            "statusBarVisibility": "visible"
        },
        "variant": {
            "statusBarVisibility": "compact",
        },
        "buildTarget": {
            "statusBarVisibility": "visible",
        }
},- Save and close the “settings.json” file. Along the bottom status bar of VS Code you should now have an option to select and change the build target. Clicking the current target brings a drop-down list of possible targets in the command pallet at the top of the VS Code window. The options that you are interested in are labeled as “Executable”. In the case of this example they are the two named “Robot” and “AllTests”. By default “All” targets will be built.
- Select each of your builds, rebuilding/deploying/testing each one in turn.